Silnik Pumy: 1.7 VCT
Rok prod. Pumy: 2000
Kolor Pumy: Radiant Red
Dołączył: 22 Sie 2011 Posty: 52 Skąd: Trzciana
Wysłany: 20-10-2011, 11:24 Mycie kloszy przednich od wewnątrz
Witam, wczoraj zrobiłem małą regeneracje przednich kloszy, lecz teraz męczy mnie jeden temat. Jak umyć klosze od wewnątrz?? szczególnie w górnej części lamy.
Jeżeli ma ktoś jakieś pomysły albo porady too prosił bym o pomoc
Lights removed from the car and in the bathtub to be washed. It pays to wash the outside of the body of the light first to prevent dirt getting inside.
I used Autoglym Interior Shampoo as a general cleaner and a sponge, rinsed off with clean water. Be careful not to use too much water and tilt the light away from the drain tube hole to avoid too much water getting in.
Clean on the outside helps keep it clean on the inside. Dry the outside off with an old towel.
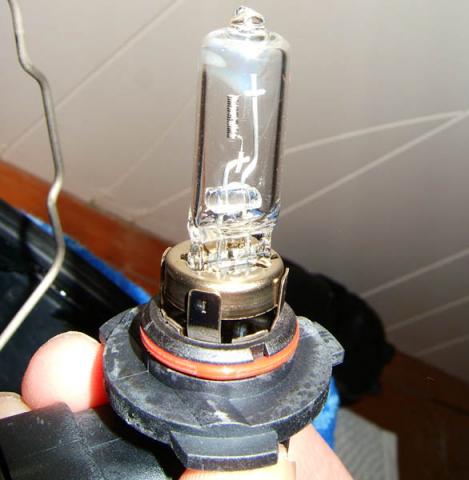
This standard HB3 bulb has been in the dipped headlight for just 12 months and functions fine. Note the element has melted and shortened which has bent the element support slightly and the glass envelope has started to go white. This will not help the efficiency of the light. I replaced all 4 bulbs (main+dip) for £25ish with quality Gerlux bulbs from a motor factor (compare this to Halfords/dealer prices).
You will now need to split the light. 4 clips hold it together, sandwiching a rubber seal. 'Pop' the clips carefully, don't force them or they will break and the light will no seal properly. Avoid touching the inside of the light unit.
I used an air blower to dust the inside of the reflectors and lenses.
With the front half you can safely rinse these off under cold running water. Fill the light up then swish the water around to clear out the loose dust and dirt.
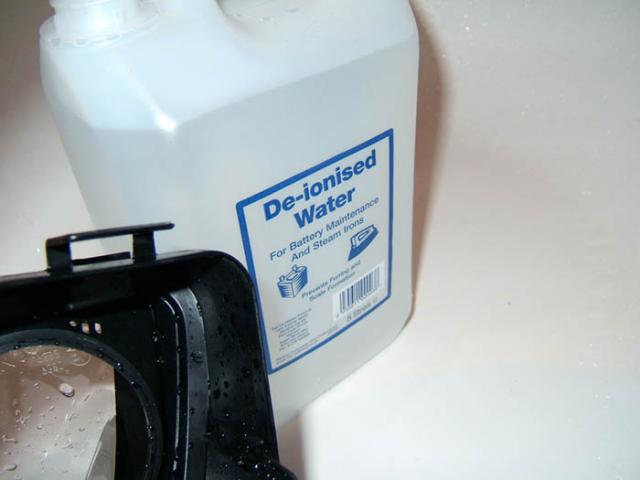
Finish off the rinse by using plenty of DIONISED WATER. This is vital to avoid watermarking the inside of the headlight - if this happens the marking will be impossible to remove.
At this stage you must let the headlight air dry naturally. I left mine for 3 days in a warm well ventilated dust free room.
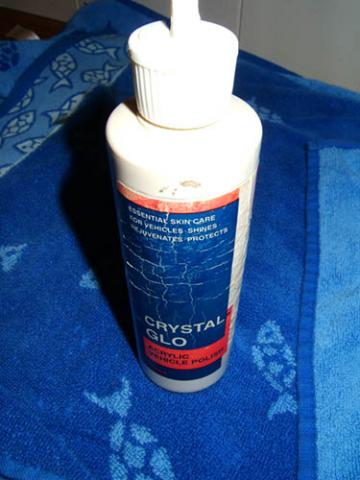
My favourite product for hard plastic surfaces is Crystal Glo. I've not seen anything that does it better.
The headlight must be totally dry before polishing the inside. I used Bounty towels as they produce little if any dust. Fold a small piece into a square then put the polish on sparingly.
Apply via the headlight holes, avoid getting the polish anywhere but on the clear inside cover.
Using circular motion apply in the areas you can reach. You will need to apply some pressure to lift the dirt so don't push the polish into areas you cannot reach.
I used a soft microfibre cloth, well shaken, to remove the polish. I reapplied and polished off 3 times to ensure good coverage. An impressive amount of dirt came off the first time I polished.
I also polished the glass lenses of the headlight units themselves. Finally put both halves of the headlight back together - listen for a positive *click* when the clips engage - finished off by polishing the outer cover with Crystal Glo.
Put the light back together and tested, looks much better, not bad for an 8 year old. There are a still lot of fine scratches on the cover caused by stone chipping which cannot be removed by polishing.
Pumapeople member spikebmth added:
could i also suggest adding the alternative lens cleaning to the wiki...
Fill the headlight about 1/2 full of distilled water and put in a few drops of dishwashing liquid. Cover the bulb opening and shake the housing for a minute or so. Pour out the soapy water. Fill the headlight about 1/2 full of distilled water. Shake, drain. Repeat rinse. Rinse again with 1/4 cup of rubbing alcohol added (promotes drying). Drain. Let headlight dry, open end down (overnight), or you can use a hair dryer to speed things up. Reinstall headlight.
Nie możesz pisać nowych tematów Nie możesz odpowiadać w tematach Nie możesz zmieniać swoich postów Nie możesz usuwać swoich postów Nie możesz głosować w ankietach Nie możesz załączać plików na tym forum Możesz ściągać załączniki na tym forum